Guide to Planning and Measuring for Your Shade Sail
Proudly Designed &
Manufactured in Australia
Shipped directly
from the manufacturer
We'll dispatch your order
within 7 business days
Free shipping Australia wide
(for orders over $50)
Planning for Your Shade Sail
Proper planning ensures your shade sail provides optimal coverage and remains secure over time.
1. Consider Sun Direction & Shade Coverage
- Position your sail to provide maximum shade where needed.
- Keep in mind that the sun moves throughout the day and across seasons.
2. Choose the Right Fixing Points
- Fixing points can be steel posts (embedded in concrete footings) or brackets (attached to structurally sound buildings).
- Ensure the structure is strong enough to withstand wind and weather forces.
3. Ensure Height Variation for Stability & Aesthetics
- Avoid a completely flat shade sail—this leads to sagging.
- A twist or slope in the sail helps with tensioning, improves aesthetics, and prevents water pooling.
- The best setup typically involves two high and two low fixing points, placed diagonally opposite each other.
- To block the sun effectively, position a lower fixing point where the sun is strongest (West facing).
4. Check for Underground Services & Regulations
- Before installing posts, check for underground utilities to avoid costly repairs.
- Consult local authorities regarding building regulations or permits required for shade sail installations.
Installing the Fixing Points
Steel Posts & Footings
- Post size: Typically 90mm–150mm diameter (larger sails require thicker posts).
- Footing depth: One-third of the post should be underground in a concrete footing, with two-thirds above ground.
- Footing width: Generally a minimum of 450mm diameter, but may need to increase depending on sail size.
Attaching to Existing Structures
- Ensure walls, beams, or fascia boards can handle the tension and wind loads.
- If unsure, consult an engineer or qualified builder.
How to Measure for Your Shade Sail
Accurate measurements are crucial for a perfect fit. Follow these steps:
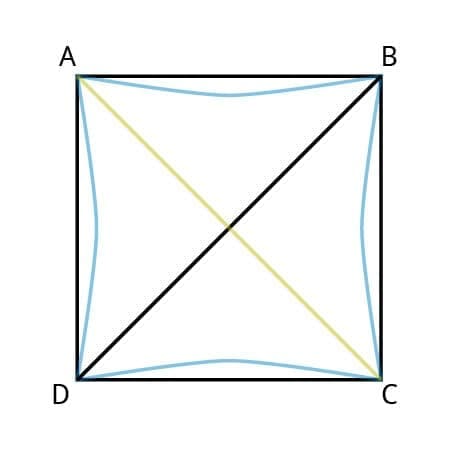
- 1. Measure from fixing point to fixing point (eyelet to eyelet).
- 2. Measurements should be taken in a clockwise direction, based on viewing your area from above (as if looking down at your sail).
- 3. For sails with more than three sides, provide diagonal measurements between all fixing points.
- 4. Record the height at each fixing point
- Heights must be measured from an equal horizontal reference level (zero datum), not from ground level if the ground is sloping.
- This ensures all measurements are consistent relative to each other, preventing an uneven or poorly tensioned sail.
- 5. Allow for fixing hardware:
- Direct Shade Sails will make necessary adjustments for turnbuckles.
- If making your own allowances, the shade sail should typically be 10% smaller than the fixing points.
By following these steps, you’ll ensure a well-fitted, durable, and effective shade sail for your outdoor space.
Disclaimer
The information provided in this guide is general in nature and may not be suitable for your specific situation. We strongly recommend consulting a qualified builder, engineer, or local authority to ensure your shade sail installation meets all safety and structural requirements.