- Take into account the direction of the sun, as you want to provide the maximum shade for your area.
- Consider the location and heights of your fixing points. These can either be steel posts embedded in concrete footings, or brackets connected to structurally sound buildings.
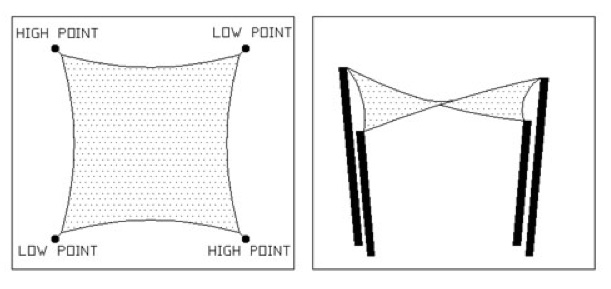
It’s important to ensure there are differing heights for your fixing points, as you do not want the shade sail to lay flat. By ensuring you have a ‘twist’ in your shade sail, not only will it be more aesthetically pleasing to the eye, but it can be tightened up more effectively, and will reduce sagging in the middle of the shade sail. - As per the diagram below, it’s best to have two low fixing points and two high fixing points, diagonally opposite each other. Keeping in mind where the sun is, you will need a low fixing point to block out the sun. The higher the fixing point, the more likely the sun is going to shine underneath the shade sail.
- When choosing post positions and layouts, be aware of any underground services in the vicinity. These can be somewhat expensive to repair once damaged.
- Please consult your local authorities as to whether or not building regulations may be a factor.
- We recommend using steel posts ranging in size from 90mm diameter up to 150mm diameter. The taller (higher) the post and the bigger the shade sail then the larger the posts need to be. This will be the same scenario for the shade sail footings.
- Footings range in size according to the height of the posts. In general, we recommend one third of the total length of post be embedded in the ground, with the remaining two thirds above ground.
Width of footings are generally 400mm x 400mm, however these will increase according to the shade sail size and diameter of posts. - If attaching to existing structures, you must ensure that the structure is adequate to handle the loads applied to the shade sail fixings during instances of poor weather and high winds. If unsure, consult a local engineer or qualified builder.
- Measurements should be taken from fixing point to fixing point (eyelet to eyelet) Direct Shade Sails will make necessary allowances for fixing hardware (turnbuckles)
- For sails with more than three sides we will require diagonal measurements between all fixing points as well
- Providing Direct Shade Sails with heights at each point will also assist us in manufacturing your shade sail
- If making your own allowances for fixing hardware, generally the shade sail should be approximately 10% smaller than the fixing points.
- This is the height taken from an equal horizontal level relative to every connection point. It is not a height measured up from ground level if ground level is sloping from other connection points
- We use 50mm seat belt webbing around the perimeter of our shade sails for added strength and durability.
- Fabric used is commercial grade, 340gsm, with a 10 year manufacturer’s warranty against UV degradation.
- Fabric offers up to 95.5% UV protection and is available in 22 different colours.
- We use a UV stabilised thread for longer life expectancy.
- Our shade sails can be manufactured to suit your individual requirements.
- Our shade sails are not manufactured with straight edges unless specified by the customer.
- It is important to understand that all our shade sails have curved edges, which allows high tensioning of the sails and minimises the ruffling of fabric when tensioned.
- The curve between corners is inward and at the midpoint would curve in by about 7% of the length of the side (measured as a straight line between corner D-Rings).
- For example a 6m side on a shade sail would curve in at the midpoint by about 420mm.
- To clean your shade sail, we recommend the use of a mild detergent with the use of a low pressure water hose and a soft scrubbing brush. Do not use abrasive cleaners or a stiff brush. Do not use chlorine based cleaners.
- Ensure the shade sail does not come into contact with chemicals, as this will damage your shade sail, and this is not covered by the warranty.
- You may wish to take your shade sail down in the cooler months. It’s preferable to store the shade sail in a protective bag to keep out mice and rats.
- When installing your shade sail, please ensure it is installed firm and tight, to reduce wind flap and wear and tear. It may be necessary to re-tighten the shade sail after a week.
- If a severe storm is approaching, it’s recommended the shade sail be taken down and stored safely. Do not attempt to remove your shade sail if it is already very windy, as you may injure yourself.
- Inspect the shade sail and in particular, the attachment points on a regular basis.
- If you have ordered a custom made shade sail, it will arrive with a reference point marked on the shade sail, which corresponds to the diagram included with your shade sail. This makes installing the shade sail much easier, as you will know which corner goes where.
- Before connecting your sail to the fixing points ensure the seat belt webbing is facing down.
- General rule of thumb is to attach the high fixing points first, followed by the remaining fixing points.
- Ensure you do not fully tighten each corner until all shade sail corners are attached.
- Slowly work your way around the shade sail, tensioning each corner bit by bit. This will ensure that you are evenly distributing the loads.
- In finishing off, make sure all shade sail fittings are properly tightened. For example, pins tightened on D-Shackles, nuts tightened up on turnbuckles etc.

